Discover Assets
Overview
Asset discovery registers your physical hardware with Colony using IPMI (Intelligent Platform Management Interface). Once discovered, assets can be provisioned with operating systems and preconfigured Kubernetes cluster templates.
Prerequisites
Before discovering assets:
- Management cluster initialized (setup guide)
- KUBECONFIG exported:
export KUBECONFIG=~/.colony/config - IPMI credentials for each asset (username, password, IP address)
- Network connectivity from management cluster to IPMI interfaces
- Assets powered on (or IPMI can power them on)
IPMI Requirements
IPMI Connectivity
Your assets must have IPMI/BMC (Baseboard Management Controller) configured:
- IPMI IP Address: Out-of-band management IP (e.g.,
192.168.2.50) - Username: IPMI admin user (often
ADMIN,admin, or vendor-specific) - Password: IPMI password
- Network Access: Management cluster can reach IPMI IPs
Common IPMI implementations:
- Dell: iDRAC
- HP: iLO
- Supermicro: IPMI
- Lenovo: IMM
Enable PXE Boot
Ensure assets are configured to boot from network:
- Access IPMI web interface or BIOS
- Enable PXE boot on management network interface
- Set boot order: Network → Disk
- Save and reboot if needed
Most servers default to disk boot. You may need to manually enable PXE boot in BIOS/UEFI or trigger a one-time network boot via IPMI.
Power On Assets for Discovery
Assets automatically discover when they PXE boot on the management network. Use ipmitool to power on and manage your assets:
Check Power Status
ipmitool -H 10.90.13.16 -I lanplus -U admin -P $PASS power status
Power On Asset
ipmitool -H 10.90.13.16 -I lanplus -U admin -P $PASS power on
Set PXE Boot
# Set next boot to PXE
ipmitool -H 10.90.13.16 -I lanplus -U admin -P $PASS chassis bootdev pxe

# Power cycle to boot from network
ipmitool -H 10.90.13.16 -I lanplus -U admin -P $PASS power reset
Bulk Power Operations
For multiple assets, create a CSV file:
# Create ipmi-assets.csv with format: ip,username,password
# 10.90.13.16,admin,password1
# 10.90.13.17,admin,password2

# Power on all assets
while IFS=, read -r IP USER PASS; do
  echo "Powering on $IP..."
  ipmitool -H "$IP" -I lanplus -U "$USER" -P "$PASS" chassis bootdev pxe
  ipmitool -H "$IP" -I lanplus -U "$USER" -P "$PASS" power on
  sleep 2
done < ipmi-assets.csv
Assets will PXE boot and automatically register with Colony.
Verification
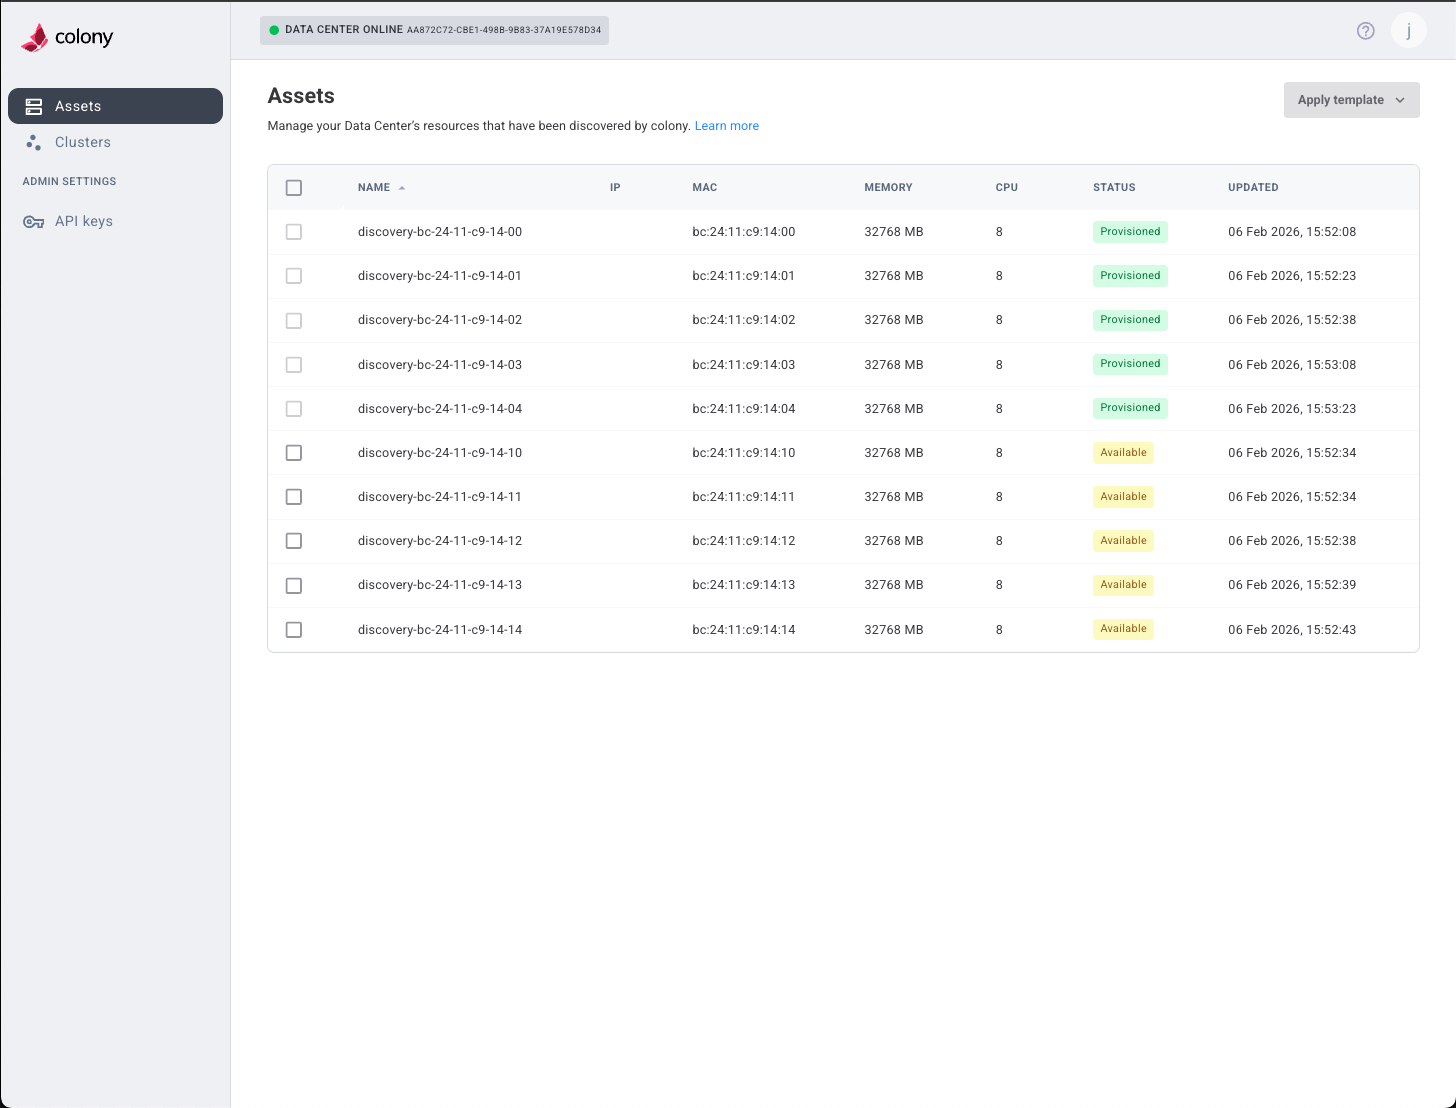
Check Colony UI
- Log in to colony.konstruct.io
- Navigate to Assets
- Verify new assets appear in the list
- Check status progresses: discovering → available
Check with kubectl
View hardware resources in management cluster:
# List all hardware
kubectl get hardware -A

# Watch for new hardware
kubectl get hardware -A -w

# Describe specific hardware
kubectl describe hardware -n <namespace> <hardware-name>
Asset Lifecycle
Assets progress through these statuses:
| Status | Description | Actions Available |
|---|---|---|
| discovering | Initial registration, hardware inventory in progress | Wait for completion |
| available | Ready for provisioning | Provision OS, Create cluster |
| provisioning | OS installation in progress | Wait, Monitor logs |
| provisioned | OS installed, ready for use | Create cluster (K3s), SSH access |
| deprovisioning | Disk wipe in progress | Wait for "available" |
Status Flow
discovering → available → provisioning → provisioned
                ↑            ↓
                └── deprovisioning ←┘
Typical Timeline
- discovering: 3-8 minutes (hardware detection, inventory)
- available: Stable state, ready for use
- provisioning: 14-23 minutes for Ubuntu, varies for Talos
- provisioned: Stable state, OS running
- deprovisioning: 5-10 minutes (disk wipe)
Troubleshooting
Discovery Fails
Symptoms: Asset doesn't appear in UI or kubectl after add-ipmi.
Solutions:
- Verify IPMI IP is correct and pingable:
ping 192.168.2.50 - Check IPMI credentials are correct (try web interface:
https://192.168.2.50) - Ensure management cluster can reach IPMI network (may need routing)
- Check colony-agent logs:
kubectl logs -n colony -l app=colony-agent - Verify Tinkerbell rufio (IPMI controller) is running:
kubectl get pods -n tinkerbell -l app=rufio
Asset Stuck in "discovering"
Symptoms: Asset remains in "discovering" status for >15 minutes.
Solutions:
- Check if asset powered on: verify via IPMI web interface or
ipmitool - Ensure PXE boot is enabled in BIOS/UEFI
- Verify DHCP server is responding to PXE requests
- Check TFTP server (Tinkerbell smee) is running:
kubectl logs -n tinkerbell -l app=smee - Review Tinkerbell workflow:
kubectl get workflows -A - Power cycle asset via IPMI and retry
IPMI Authentication Fails
Symptoms: Error: "unable to authenticate" or "invalid credentials".
Solutions:
- Verify username and password in IPMI web interface
- Check for special characters in password (may need escaping)
- Some IPMI systems use different default users (ADMIN, admin, root)
- Reset IPMI to factory defaults if locked out
- Consult hardware vendor documentation for default credentials
Asset Boots from Disk, Not Network
Symptoms: Asset doesn't PXE boot, boots to existing OS or "no bootable device".
Solutions:
- Enable PXE boot in BIOS/UEFI boot settings
- Set boot order: Network → Disk (or use one-time boot menu)
- Verify correct network interface is set for PXE (usually first onboard NIC)
- Check DHCP server includes PXE boot options (next-server, bootfile)
- Manually trigger network boot via IPMI:
ipmitool -H <ip> -U <user> -P <pass> chassis bootdev pxe
Asset Not Reachable on Management Network
Symptoms: After PXE boot, asset gets no IP or wrong subnet.
Solutions:
- Verify asset is connected to correct network (same as management cluster)
- Check DHCP server has available leases
- Ensure network switch ports are in correct VLAN (untagged)
- Check for MAC address filtering or port security
- Verify network cable is connected and link is up
Hardware Detection Incomplete
Symptoms: Asset shows in UI but missing CPUs, RAM, disks, or NICs.
Solutions:
- Wait longer (full hardware inventory can take 5-10 minutes)
- Check asset console via IPMI for error messages
- Verify hardware is properly seated (reseat RAM, drives if accessible)
- Check for BIOS/firmware issues (update firmware if needed)
- Some hardware may not report inventory via standard methods
Bulk Discovery Tips
Prepare Asset List
Before bulk discovery, create an inventory:
# assets.csv
hostname,ipmi_ip,ipmi_user,ipmi_pass,datacenter,rack,slot
server01,192.168.2.50,ADMIN,pass1,DC1,R01,U01
server02,192.168.2.51,ADMIN,pass2,DC1,R01,U02
server03,192.168.2.52,ADMIN,pass3,DC1,R02,U01
Stagger Discovery
Avoid overwhelming IPMI systems:
- Add 5-10 second delay between discoveries
- Discover in batches (e.g., 10 at a time)
- Monitor for failures and retry
Use Consistent Credentials
For easier management:
- Set same IPMI password on all assets
- Use consistent username (e.g.,
ADMIN) - Document in secure password manager
Label Assets
After discovery, tag assets in Colony UI:
- Datacenter location
- Rack and U position
- Hardware generation
- Purpose (compute, storage, etc.)
This helps with organization and troubleshooting.
What's Next
After discovering assets:
Wait for "available" Status
Monitor assets until status changes to "available" (3-8 minutes).
Choose Your Path
Path A: Provision Ubuntu (required for K3s):
Path B: Create Cluster (Civo Stack or Talos Linux):
Path C: Provision K3s (after Ubuntu provisioning):
Learn More
- Asset Management - Asset lifecycle and operations
- Cluster Provisioning - Create Kubernetes clusters
Need help? Join our Slack community for support!